Fixing or Replacing a Nissan Quest Window Motor Part 2
Part 2 - Replacing A Nissan Quest Window Motor
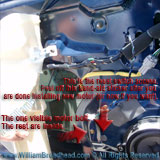 Figure 1 - Orient Yourself - Once you have the panel off, peel back the insulation about half way. I used duct tape to hold it out of the way while working. Here I have illustrated the one external motor bolt that holds the motor to the door frame. Near that is the hole covered by a small foam sticker to access the anti-pinch reset limit switch. The yellow cord is part of the motor and you can disconnect this and plug in your replacement to make sure your new motor works and that it truly is not your arm rest control switch, contacts or relay.
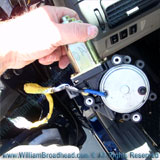 Figure 2 - Motor Testing - Once I got this far, I plugged in my replacement motor and reconnected the armrest control panel and tested my motor to make sure that it really worked and verify it was not the switch or relay. It did.
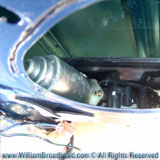 Figure 3 - Inside View - This is a view of the motor through the speaker hole. You will need to remove the speaker (connected by three big grabber screws) to get at the bolt holding the window to the tape guide / rail-pulley-motor assembly so you can push it out of the way.
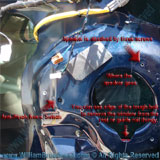 Figure 4 - The Evil Bolt - The evil bolt is just below the speaker hole and even though you can easily see it, the limited clearance and slightly off angle make it a bugger to get off.
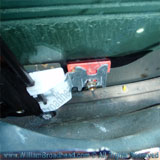 Figure 5 - Close Up Of Evil Bolt - Here you can see how deceivingly accessible this bolt seems. It is not. But you can do it! THere is a matching one on the left but it is much easier to get at.
 Figure 6 - This is the rail-pulley-motor assembly removed through the large access hole to the left of the motor. This is flipped over so you can see those 3 bolt headed screws that are impossible to get at while the rail is in the door panel and with the window down.
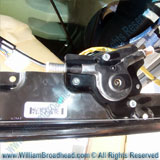 Figure 7 - This is the rail-pulley-motor assembly removed through the large access hole to the left of the motor. This is flipped over so you can see those 3 bolt headed screws that are impossible to get at while the rail is in the door panel and with the window down.
Detaching the Existing Window Motor
There are two possibilities at this point. Your window is either up or down, right? If it is up, you are in luck. Or at least I think you are. You (probably) do NOT need to detach your window from the tape guide and / or rails as it should be out of the way to be able to access the lower rest rail / pulley / motor assembly. If you window is up, proceed to removing the said assembly and skip this next little section. Lucky!
Detaching The Window
Step 1 - Remove The Interior Window Bolts
With the window down and attached and sitting in the guide rails, you have no chance to get at the bolts on the back of the window motor. You also have no chance of the getting the assembly out because of lack of clearance. After realizing that if I took the whole assembly out, it would be easier to get at the three bolts on the back of it connecting the motor to the rail, I tried doing that. But I quickly found I HAD to get the window out of the way. I thought I would go crazy at first because the bolt on the interior side holding the window in place was in a very awkward location.
The window is attached to two rails (tape guides) by bolts in two places with a 10mm bolt. You absolutely have to use a clean crisp 10mm socket. A worn one or SAE almost equivalent socket will just slip and slip. With the window down, it also is very very difficult to get at. Anyway, get your socket set out and if you have a swivel joint you will be able to do this. If you don't, go get one. Maybe if you have very skinny but very strong hands, you can get away without one by just using a crescent. Maybe.
The left bolt will come off pretty easily, but the right one will be at a very odd angle that you will barely be able to get at with a swivel joint. It will be too shallow with a straight socket shot. Maybe you can do it with a thumb wheel but it would be hard to get enough torque to break the bolt seal.
Eventually with the swivel, you will be able to get it to catch and little by little with lots of persistence you will be able to get this bolt out! I finally got it off by getting just the right amount of directional torque with my left arm squished way in behind the glass from the left side and the right hand turning the flexi-joint.. That got it loosened but was almost impossible to turn that way. So then I slowly caressed it off with a crescent, 1mm at a time... bloody! But it IS possible. So keep at it. The most frustrating thing is that it is perfectly visible and reachable, but it has no clearance and is at an odd angle.
Okay, got it? So here is the trick. If the window is down, once you have BOTH tape guides bolts detached, it allows you to push the window off its track (yes, actually out of its track and up against the backside of the door frame) and that gives you enough room to actually slide the resting rail and pulley assembly out of the door frame allowing you to turn it around and easily access the backside of the motor.
Step 2 - Detach And Slide Out The Motor-Pulley-Rail
Once you have the window out of the way, take off the two nuts that are holding the rail to the frame. I have labeled the spots in Figure 6. The left one is not shown but you can easily find it. This part is easy. Once you have the rail loose, slide it out the big access hole in the door frame. Don't worry about the pulley cables too much but don't go twisting the rail all crazy either. Just flip it over so you can get at the back side of the motor assembly.
Step 3 - Remove The Three Bolts Headed Screws From The Motor
Remove the three screws holding the motor to the rail. And they are screws, not bolts, even though they have 10mm octagon bolt heads. These are effectively grabbers screws that just thread themselves into the plastic holes on the motor assembly. This basically the last thing to do before putting in the new motor and putting it all back together.
Put It Back Together
Putting it all back together is a lot simpler.
Step 1 - Attach New Motor
Attach the new motor to the rail you just took out. CAVEAT: The three screws with bolt heads attaching the motor are grabber screws. Do NOT tighten too much or they will strip your new parts holes and then you ARE screwed. Just get them nice and snug.
Step 2 - Put the Rail Back In
Put the rail back in the way it came out, tighten the two nuts on the bolts protruding through the frame. I did this loosely first while I reassembled the rest. I wanted to make sure it was all together and working before tightening everything up.
Step 3 - Put The Window Back In The Guides
This is the trickiest part of putting things back together and it probably took me 15 to 20 minutes of cajoling. It might have been slightly easier with a second person as well. Basically to get the window back in its tape guides take a fair amount of force and patience. The rails are a little bit flexible but not very. Just keep at it and you will get it back in there.
Step 4 - Reattach The Evil Window Bolt
Once the window is in the rails and set in the resting rail-motor-pulley assembly correctly, it is immensely easier to attach the bolts at this point because you should be able to raise the window with the new motor about 6 inches placing the right bolt directly in the center of the speaker hole giving you facile access to reattach it. If you haven't already attached your armrest controller and tested the motor, you better do it now so you can raise the window a few inches. Attach the left bolt and you are almost done!
Step 5 - Tighten It All Up & Wrap Up The Package
Tighten up your motor pulley and front tape guide assembly bolts now that you know it all works. Put the speaker back in and attach its wires.
Then that bugger of a screw that held the window to the front tape guide is so much easier because you can raise the window a few inches so this bolt is accessible in the center of the speaker cut out. Five seconds to put together what seemed like a good hour to take off. Yeah!
The rest just goes back together the way it came off. SO easy if you know you need to take both tape guides off that is. Attempting to do this with the window down and in the way was IMPOSSIBLE.
CAVEAT: Do NOT replace the door panel until you have done 3 things:
- Test that you have correctly replaced the locking mechanism cable (shown in Step 1 and 8 of Page 1)and that it actually works!
- Test that you have correctly replaced the door handle cable (shown in Step 1 and 8 of Page 1) opening mechanism actually works (from the inside!
- You have reset the Anti-Pinch (instructions on Page 3 of this article).
Go To: Replacing a Nissan Window Motor - Part 3
CachedSince:{ts '2024-07-27 03:07:35'}

