Fixing or Replacing a Nissan Quest Window Motor
Replacing A Nissan Quest Driver's Side Window Motor
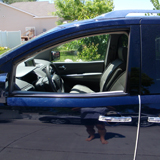
One day, the window went down and never came back up on our 2007 Nissan Quest. The driver side window is the most likely to fail as it typically gets the most use, so after 70k miles, this was not too unexpected. However, I did not want to pay $600 labor and parts to the local dealer if I could do this myself. I tried searching online and found very very little information on how to fix this other basic diagrams, vague general instructions, or go to the dealer. So decided it should not be too hard and I tackled it. I took pictures along the way so you can do it easily, confidently, and cheaply. You can feel confident you won't tear your car apart and have no idea if you can ever put it back together or how much damage you might do to other parts (my fear usually).
Why won't the window roll up?
The very first thing was to make sure it was really the motor that was the problem. Without taking the door apart and testing connections for voltage, it is impossible to *know* if it is the motor, but since the master window controller worked for all the other windows and the switch in the control made what sounded like a contact sound (justa a little pop of electricity being passed through the relay) when trying the driver's window but no motor action at all, I felt about 93% sure it was the motor.
There was still a bit of a chance it was the switch or contacts but I doubted it. So I ordered the part for $140 from USAutoParts.com for a remanufactured (commonly called remanned) motor. They had the best price and I had ordered from them before for various pieces with no real issue (their shopping cart is a little hokey and confirm emails are sporadic and they actually lost this order the first time and I had to re-order it, so where ever you can get a good price, you know?).
So I effectively after waiting 12 days and then re-ordering the part, it showed up in three days by FedEx.
Once I Have The Part, I Am Ready To Do This Thing!
 Step 1 - First Bolt - Just pop this cover Off and remove the bolt behind it
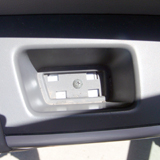 Step 2 - Second Bolt - The second bolt is under the arm rest where you grab the door to close it. The cover just pops out.
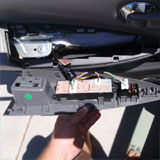 Step 3a - Pull out the armrest control module thingy - The third bolt is underneath, just above where the second bolt was.
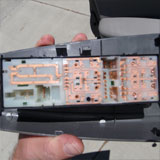 Step 3b - You can check your contacts and make sure they are clean. These are very shiny and clean.
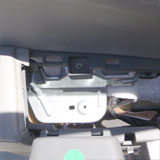 Step 3c - Third Bolt - Once you have the arm rest removed, the last bolt (not including the fake plastic screw) is underneath the arm rest, just above the bolt that was under the snap-in cover in the arm rest.
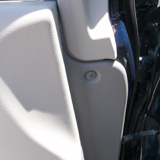 Step 4 - This fake plastic screw needs to be removed. I am not sure if it does much and I was not careful enough with it and it broke off (I thought it was real and treated it as such). It does not seem to be functional and only is cosmetic in as much as it covers a hole that is probably not necessary.
So now trying to actually fix the window, I am getting mildy frustrated. Or as some might say, frustered.
The replacement window motor part came with general vague directions that basically showed a couple generic door panels. These so-called directions said: "Take the interior panel apart, remove the motor, replace the motor, replace the interior door panel." Brilliant... okay! I'll just do that. :-)
I had basic diagrams from online, and I have taken door panels off other cars, but I wanted to do this cleanly. No one had decent instructions but I felt confident enough I could do it but figured I would take pictures along the way A) so I could put it back together B) so I could share with you how to do this. So I hunkered down for what might be a long afternoon.
So Here Are The Steps To Replace A Window Motor
First make sure you have the basic tools you will need. This normally won't take anything special, but if you don't have basic these tools, go buy them. You will still save oodles over going to a dealer.
Tool List:
- A decent #2 Phillips screwdriver
- A small flat head screw driver to pop covers
- A metric socket set and/or crescent/box wrenches
First Round of Undoing
First, there are 3 bolts (with Phillips heads) and one fake plastic screw to remove.
Step 1
The first screw is behind the handle behind a little pop out cover. Use the small flat head to pop out the cover and then the Phillips to take out the screw.
Step 2
The second screw is under the cover of the door handle. Use the small flat head to pop out the cover, and the Phillips to take out that screw.
Step 3
The last screw to remove before you can remove the door panel is located under the control panel console. This is the front part of the armrest with the mirror, lock buttons, and window controller switches. You need to gently but forecefully lift the panel out of the armrest. It should pop out with out too much trouble and nothing should break off so don't worry. Yank it out! You can choose whether to disconnect all the modular wire harness or squeeze the arm rest through the panel when you take it off. It is easy to reconnect later for testing if you want.
Step 4
Then go ahead and take out the fake screw with the Phillips. Be gentle with it. It is not really a screw, just a plastic thing that looks like a screw (what real functionality it has I have no clue) and if you force it too much it will break. I broke mine but I don't think it really does anything so we will live.
I took the arm rest panel out to see if there were any screws under there but there are NOT. You do not need to remove this piece. It just pops in and out though. No biggie.
Second Round of Undoing
Now you need to disconnect the control panel from its wires. Optionally, you can squeeze it through the hole and leave it hanging but I wanted to get it out of the way while replacing the motor. I ended up reattaching it soon after to test my replacement remanned motor so set the panel someplace safe and accessible. You will want to test the new motor before reassembling everything just in case!
Step 5
Detach the gas door release and undo its wire connector. It should pop out easily.
Step 6
Detach the courtesy light at the bottom of the panel. The crystal should pop out easily with a little squeeze and then detach the electrical connector.
This should be enough to get the door panel off easily.
Third Round of Undoing
Step 7
There are a seven plastic snap-ons to detach as you pop the door panel off. Lift the door panel upwards gently to get it off the lip of the frame (where the glass comes out) and then feel along the outer edges of the door panel to gently pop these plastic connectors applying equal pressure around them with your hands. Four of the plastic snap-ons are along the outer edge (away from the hinge) and three are along the interior edge (near the hinge).
When all is said and done, I had to do this three times after when I reattached everything and found I didn't get the lock and door handles re-connected just right. I did not pay attention to my own photo of the cables correctly set in the handle! So the snaps hold up pretty well and are pretty sturdy. I have seen on many cars these types of connectors basically disintegrate and are expected to be replaced each time they are undone. You should have no issue like that on the Nissan Quest at least.
You can see what they look like in the picture titled Step 7 .
Once you have all those popped, the panel should basically fall off. Just make sure you unhooked all the wire connectors before giving it a big yank!
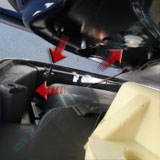 Step 7 - There are seven (7) of these snap-on connectors. These are the last things holding the door panel on. The come apart pretty cleanly. Just be gentle and slide your hands in behind them to pop them out.
Step 8
The only thing left connecting it will be the two cables that go to the lock and door opening mechanism. These both just unhook easily but pay attention to how they slide in. The lock mechanism is very simple ball joint, but the opening mechanism needs the edge slipped into the edge of the handle to keep tension and then also be hooked into the lever back. I did not notice it needed to be slid in to a fixed position the first time and had to redo it a couple times. The spousal unit did not like having to roll down the window to open the door from the outside to get out.... hum.... picky picky ;-).
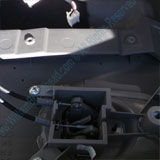 Step 8 - This is what the cables to the door handle and lock should look like when you take off, and put back on, the door panel
Step 9
Lastly, peel back the foam and fibre insulation so you can get at your work area. I used duct tape to keep it out of the way and did not need to peel off the whole thing. You should be about to peel back about 50% of the lower right insulation and be able to get at everything you need to. Don't worry about the gummy stuff reattaching. It does fine at resealing the foam to the door frame. I did however use a little duct tap on the corners of the fibre to make sure it stayed in place when I reattached it. Now you are ready to do the deal!
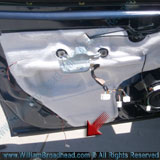 Step 9 - This is what you should have once you remove the door panel. Note the snap on connectors might pop off and stick in door frame. It will be easiest to put them all (7 of them) back in the door panel when you re-attach it.
Go To: Replacing a Nissan Window Motor - Part 2
CachedSince:{ts '2025-07-18 18:21:06'}

